Showing posts with label twine. Show all posts

Tuesday, September 23, 2014

For The Love Of Twine

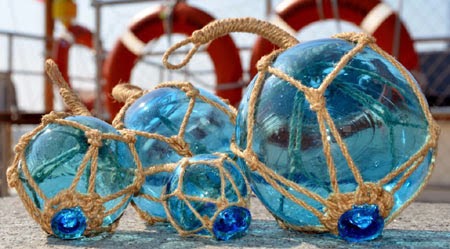
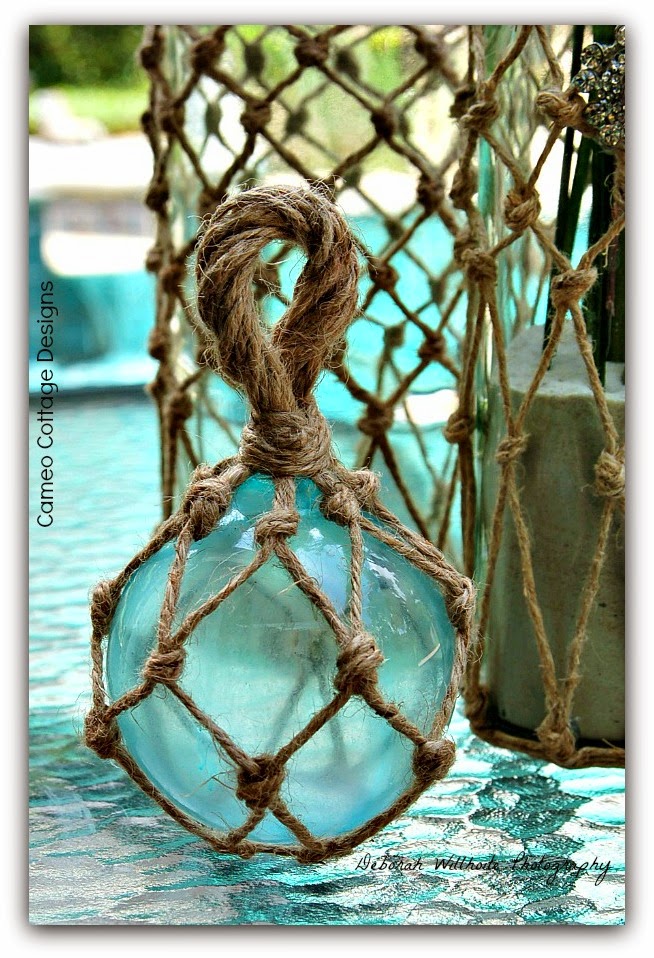
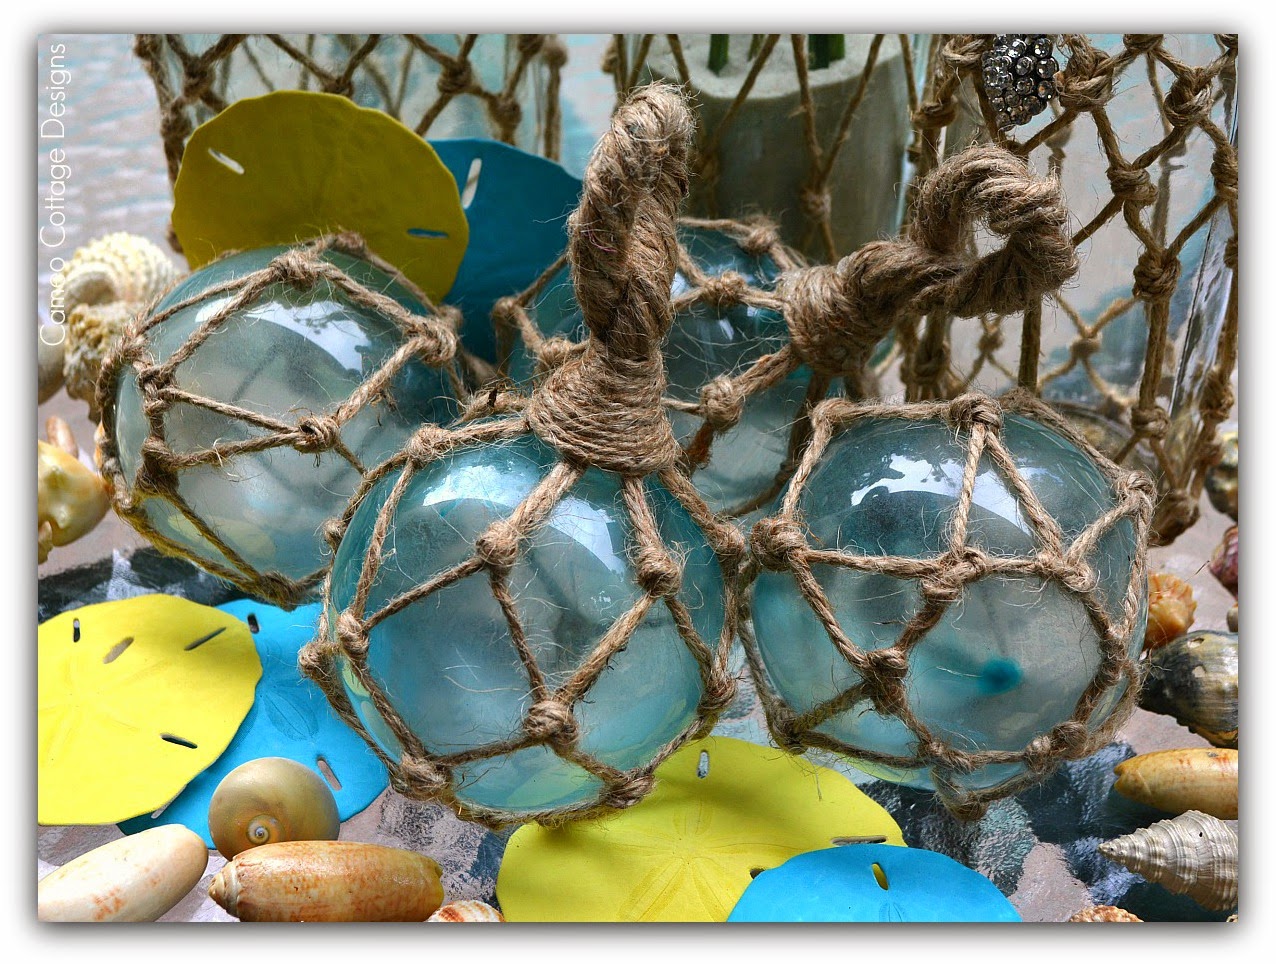
Are you a crafter, gardener, or a jack-of-all-trades kind of lady? If you are any of these then I am positive you know and have used twine before! If not, then I am going to share some surprising ways one can use twine! Twine has a plethora of ways to use and incorporate into I swear almost anything! I have used it in so many ways and projects my list is too long to list! One of the things I love about twine especially when used in my many craft projects, is the feel of a nautical beachy, or rustic look it gives. I like that a lot!
 
Recently I found this website through a friend of mine called Hometalk. Have you heard of it!? Well if you haven't you need to visit! It's an amazing site! I have been spending alot of time there when I'm not crafting.
 
At Hometalk, you set up an account, and then you can scroll through hours of projects for home and garden, and diy tutorials, and clip them to boards you create for future reference. Plus you can make comments on the things you like, pin them to Pinterest, Facebook, Tweet It, Google+ it, or email it to a friend. And....the best part....you can post your projects just like if you were blogging too!
 
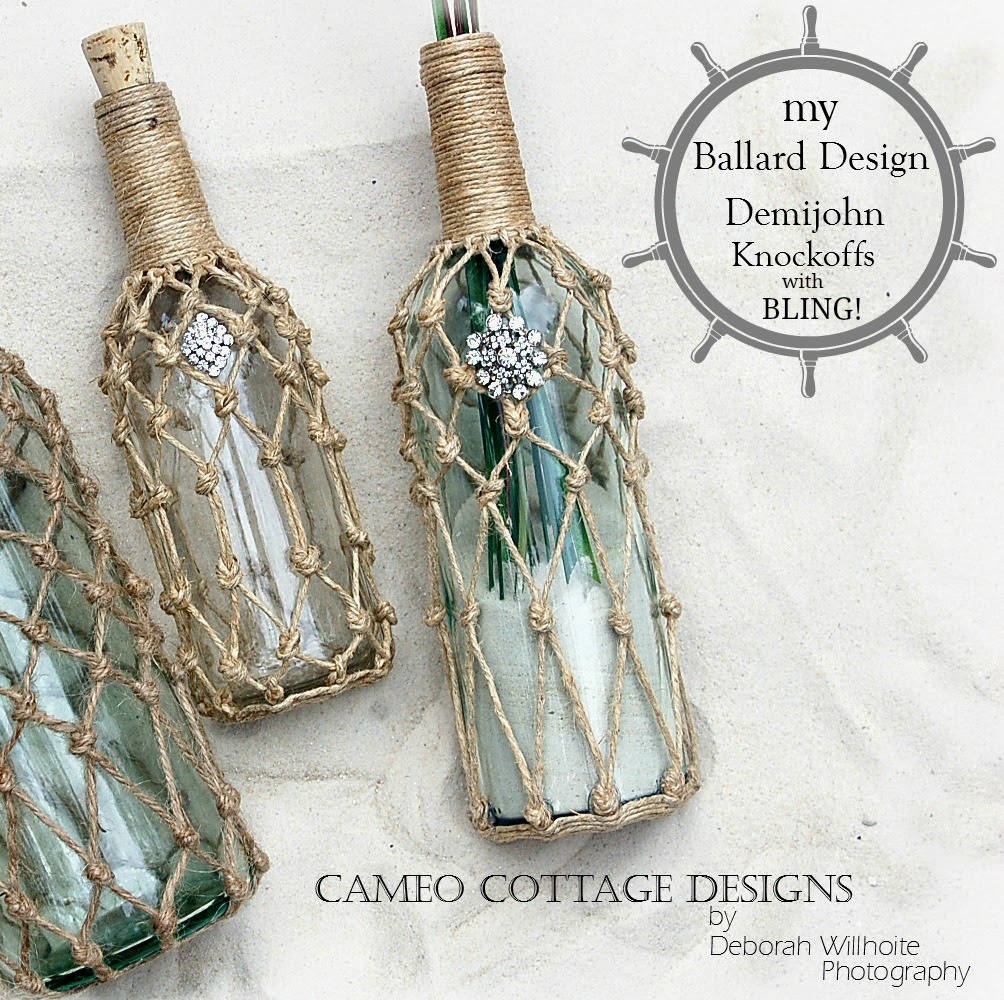
In fact, I was so honored that my very first post, My Ballard Design Demijohn Knock Off Bottles Only Better With Bling! was featured right off! And they went viral! Every where, Pinterest, Facebook, and on other blogs and web pages! I was shocked!  And then, one of the gals at Hometalk visited my blog and fell in love with my twine wrapped bottles I made for my mom along with another twine wrapped bottle I did. I was asked to post those on Hometalk because they wanted to do a feature on those also! Now how lucky can one girl get in one day!
 
Plus when you post a share, you can add several pictures, of your project, and link it to your blog or website for more info if you want. Or just blog it all right there if you don't have a blog or website! How cool is that! And one more thing, if you have questions about anything, just ask! There is a group of professionals there to help and guide you along with everyone else on Hometalk that is a member if they have information to share on your question! It's great!
 
Hometalk has an audience of over 700,000 followers!
 
I was asked to curate at board for them on twine! Now that was really exciting and scarey all at the same time! I have never done that before....didn't even know what it was! But once it was explained to me, I was on it! It was suppose to be 10 to 15 projects using twine. Well I found over fifty I liked lol! I weeded and weeded, found some more, weeded again and got it down to 27.
 
I was aiming to try to show just how useful twine is, and how many ways twine can be used along with how may types of twine there is! From just a little touch of it, or a whole project, twine can change the look of anything for that just right finish! With the ones I choose, which was tough to decide with so many I wanted to share, you will also I'm sure be inspired by all the projects themselves that the twine was used in. I was for sure! Twine is a commodity no one should be without!
  
 
Click this link to see all 27 projects and get inspired yourself!
 
Some of my favorites were:
 
Let's start with some of my favorite Christmas twine
uses seeing as the holidays are just around the corner!
 
 
Don't you just love this display from House On The Way! This whole display is simply stunning! Those little cone twine wrapped Christmas trees just top it off giving this prettiness a touch of the rustic outdoor look of nature. See those gorgeous white balls!? You can also wrap balls in twine and add a sprig of holly and red berries too!
 
 
And look at this adorable cookie cutter wreath from Serendipity Refined! Here just that little touch of waxed twine to tie the cookie cutters on with just gives it a sweet finish too. Love this idea! Oh and those sweet mason jar candle holders ..... twine was used there wrapped around the top a few times holding a sprig of pine and holly berries in place. Very pretty!
 
 
This idea from Chirping With Charm is a great use of twine and a darling repurpose! Mason jar lids wrapped in twine for the sweetest ornaments! Just add some pretty holiday trimmings perfect for your tree!
 
 
One thing I love to use twine for is gift wrapping gifts. You can wrap paper wrapped gift boxes with it, or do like Andrea at Personally Andrea did here with this sweet way to wrap this candle gift! Here she used the twine for attaching the tag slipping it through a button and tying it in a bow. Special touches like this are such a thoughtful way to present your gifts. Twine is good!
 
 
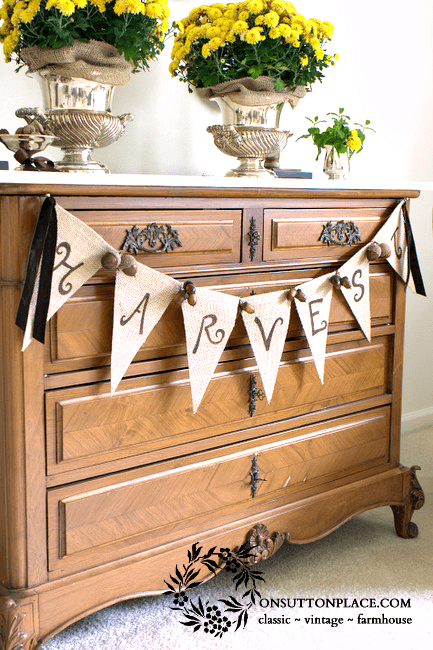
Do you love to make banners!? Well the perfect item to hang your pretty banners on is twine! And if your banners are made with burlap...even better! Twine and burlap are like pea's in a pod together! Twine is pretty strong and can hold a good amount of weight too! Although banners weight very little....but isn't this great! Plus, the twine doesn't over ride your pretty creativeness. See how Ann at On Sutton Place did this. Just lovely isn't it....oh and wait till you see what she did on the backside of the banner! Ideas, Ideas, Ideas! Get your twine ready!
 
Now lets wander away from the holidays! Take a look at this genious use of twine and a fab repurpose/recycle for your garden!
 
 
A bicycle wheel trellis! How cool is that!
 
See more that Stephanie shares from her Garden Therapy on this unique idea and use of twine! It's great for the garden. Oh and I saw somewhere that if you take twine and do a knotted netting fence...you know...like a fishermans net, it helps to keep out small critters who love your garden more than you do!
 
 
And this framed artwork is adorable from Maryanne at Domestically Speaking!
Just that touch of bakers twine along the edge gave this sweet burlap heart more meaning! I see "Love and Kisses!" The bakers twine gives the artwork some pop and frames the heart as well. Love this idea! I'm thinking Mother's Day, a birthday, and of course Valentine's Day! Maybe even a rustic wedding prop with initials and an arrow added!
 
And this is just one last of my favorites! I had so many but just click the link under the "For The Love Of Twine" banner above and find more uses for twine!
 
 
Isn't this a cool use for twine! And what an idea! This really appealed to me because I am trying to grow my own herbs. So if I'm successful, now I can take this idea for drying my herbs! And of course I have a ton of twine!!!
 
Want to see more unique uses for twine!? Check out my "For The Love Of Twine Board"  and get inspired....to use twine!
 
Thanks Hometalk for the opportunity to create this fun board! I love twine!
 
Hope you all enjoyed the board and find some things that you just have to try using twine! If you have more ideas, share them at Hometalk! Everybody is looking for new ideas! If you haven't been to Hometalk....get there today!
 
Have a lovely day!
 
TaTa For Now!
 
 
Sharing At:
 

Wednesday, September 17, 2014

Two Stones And A Stick! Sailboat Paper Weight

Well they say summer is over and Fall is here...but here in my world, it's still summer! I do have to admit it feels like Fall, smells like Fall, the leaves are falling, the sun is shifting, and it's getting darker an hour earlier too boot! I'm not a happy girl. One good thing for me is with living in Florida, it's like summer year round, although we do get some very cold days in December, January, and February ... even this last March we had several cold cold days. The worst for me with Fall and Winter is how the daylight gets shorter and the nights get longer. I really really don't like that at all!
 
Well I won't let this change of season's take our dream away, the dream I have had all summer..... a house by the beach or a lake! I have been making several things to decorate this little dream place of ours in a beachy theme.
 
Two weeks ago it was my Mr.’s Birthday. I have been designing a home office for him and I had this idea to make him a gift this year. Well it was one of his gifts. I decided he needed something beachy but it needed to be masculine too. I wanted it to go well with leather furniture, his dark wood desk, bookcases, a few antiques, and not clash with his golf stuff, or his collection of memorabilia of nerdy things. He's a software architect, designer, and developer, for the medical profession. He is quite the smarty pants he is!
 

So I made him this! It's a sailboat paper weight!
 The "SS Jack!"
 
I think it looks pretty masculine and looks great on his desk! It has a bit of a rustic old nautical look. I like it a lot with his antique clock and vintage books. And...he loved it!!
 
I use to sail a lot back in the day when I was pregnant with my first child. I miss doing that so much, and have as part of our dream place on the beach or lake, a sailboat on my list! Oh my Mr. loves sailing too! We both are water freaks and love the calm and peace we get being around the water. I hope by the time we get our dream, he will be able to sail with me. The biggest problem will be being able to get him in and out of the sail boat. I'm going to have to put my thinking
cap on and come up with a solution for that. He has been trying to recover from a bad stroke six years ago now. Still so far to go...but we are still hopeful!

 
I was sitting out by our pond in the back yard watching the goldfish and I spotted these stones. I thought of different rock art I have seen and thought about trying to paint something on them. I love to recycle and I hadn't tried anything with stones yet, but today I would! How it got to be a sail boat I can't tell you.....but two stones and a stick later I had the "SS Jack!" Well actually a couple of weeks later!

 
I stacked my two stones on top of each other and walked back to the house. I set them on the patio table and all of a sudden I got this vision in my head! Maybe it was because of sitting by the pond staring into the water and thinking about growing up on the lake, and missing what I used to love, the lake and sailing. Sailing! My vision was sailboat! Maybe I could pull this off! So I went and got some white spray paint and painted both the stones completely. While they dried I went into the woods next to my house to find the perfect stick.
 
OH!!! BTW! Today as I am writing this post on my back patio, I hear this big noise at the side of my yard! I get up to go look and there is this big black bear walking along side my house! Freaked Me OUT! Not going in those woods again, and probably won't be sitting out here at night anymore either! Now I know what all those noises that sounds like someone is walking around at night must be! Durn bears! Didn't know they were right around where we live! And we live twenty blocks away from downtown Mt. Dora! I called my friend from animal control to report this and she tells me, "Oh yea, there are several bears in our area! I'm now thinking, it's time to move!
 
 
Anyway....I found my stick, and once the paint had dried on my stones, I took some Gorilla Super Glue spread it over the stone that was going to be the bottom of this sailboat, then took my glue gun and spread a good amount of that on because that sets quicker than the Gorilla Super Glue does. I then set my smaller stone on top. I used both glues because I didn't want the top stone to slide off before the super glued dried. Those stones are heavy buggers believe it or not! When picking this up if it fell apart and hit your toes, that stone would bring tears to your eyes! Anyway, the two glues worked great and they are good and stuck together. Next I glued the stick on the top of the two stones again with both glues. I tried using just the glue gun but it kept falling off. I think it was because of the paint, it just wouldn't adhere well. 
 
I set the stones now the boat, on my counter to let it set overnight to make sure all the glue had dried so it wouldn't come apart on me. Now I go looking for some fabric for my sails. I found this blue plaid shirt of my Mr. that I hate him wearing, so I thought this would make great sails...I loved the blues and yellow with the white in the shirt .... and this way hubby won't wear this darn thing again! It looked like an old man shirt on him!
Well that was as far as I got. I just couldn't get inspired any further. I looked at it every day for two weeks as I walked by it a bazillion times a day. Just couldn't see it. Maybe it was the fabric I was planning on using, I don't know.
I moved on to making a Fall centerpiece of candle holders for my table, a mummy pillow that I saw on Pottery Barns website, and some toilet paper rustic pumpkins. I had crap all over the place. As I was cleaning up, I came across some natural looking rope I had planned on taking back to the store and forgot to do it. I picked it up, looked at my stones and saw the glue that oozed out from when I glued on the stick. The rope would be perfect around the bottom of the stick to hide the glue. And.....it had a nautical look to it! Perfect!
So I added it and liked it! But then I thought I should put some rope around in between the two stones. Did it and, I liked it a lot too. Now my brain is getting inspired and I see my boat vision, but better than the first vision! With my other projects I had been working with my drop cloth fabric, love that stuff! The color I have is in a natural off white, which played along with my rope. Now I'm on a roll and thoughts and pictures are flying in my mind!

 
Side note: That photo in the frame behind the sailboat is a picture of the old house I grew up in on Fine Lake in Michigan. It went through a couple of remodels and that screen porch became more living area, and then it was a kitchen. A year and a half ago it was torn down to the ground and a one story took its place for my mom. It was on that lake, I learned to sail. If things work out, my hubby and I hope to be living there in the summers. My mom passed away this last May and left it to my five sisters and I. We've rented it for the time being, but hopefully next summer we will have it back and be staying there and, I will be sailing that lake again all summer long! Two of my sisters sent me that picture in the frame for my birthday this last July. At the bottom of the frame it says,
"Where memories are made." Our whole life of memories are at the place...with the new house being built by the hands of my moms family to boot!.......That place is staying in this family! We aren't done making memories yet!
 
Now back to my sailboat paper weight gift again! 
 
I laid my boat over on it's side on my drop cloth to draw a line for the shape of the stick. Then from there I drew the rest of the sails from that and cut them out. Then I decided I wanted stripes on the sails so I found some nautical colored fabric paint I liked and taped off my stripes using some painters tape and painted in my stripes. I let that dry, but thought the sails needed something to frame them, plus keep them from raveling. In jumps the twine! When the paint dried I got my glue gun and little by little I edged the fabric with my glue gun and laid the twine in place. After that was done, I decided to put a strip of the twine around the rope pieces too. That just seemed to be the perfect thing to enhance the rope. Now it just seems to all play together.
 
Yea! I was happier with it now! 
 
 
Then I remembered sails have numbers on them! Why I don't know, but I needed to add some. As I was pondering what I wanted as numbers, I came up with two important dates. That would be just perfect and as my hubby is big on every date that pertains to everything in our life together, I went with the date when we met fourteen years ago... August, 11 back in 2000. That was the day we were to be married on too, but his stroke messed that up. Now because this was for his birthday, the other set of numbers became his birthday. September 6. I got so excited because I knew knowing my hubby like I do, he was going to love this! I drew those on by hand with a black gel ink pen.
 
Next I needed to name this boat.....this boat was for him so "SS Jack" it was! I got out my stamps and ink pad for the name and stamped it on.
 
I added one more piece of twine to represent that thing you hoist the sail up with....can you tell I don't know sailboat lingo lol. One more thing...a flag for the top of the mast is it? I don't know but I cut out a flag shape, painted it and attached to the top.
 
As I was sitting looking at it being so pleased with my little gift and myself, I was playing with the twine and thinking knots. That lead to making a knotted loop for a throw line to hook the boat up to a imaginary dock.....oh and one more thing, port holes.....had to have port holes using the twine for them too....and DONE!
 
Not bad for two stones and a stick aye!?
 
 
Hubby loved it....I loved it! My vision went from here to there, to this. I am amazed with myself in how it turned out! It's amazing how bits of nature can be used to create fun projects that can become a nice little accessory to decorate with and with a purpose. And this one with a dream attached with it too!
 
Now when that house by the water where ever it is comes along, and hopefully my moms so I can go home at least part of the year....(no winters for this girl), this is going to be even more perfect in hubs office! And while he is working I'll be out sailing! Or maybe I'll figure a way to get him out sailing with me too! I hope!
 
When dreams come true!
 
Oh remember that ugly shirt I was going to use for the sails and didn't, well I hid it at the bottom of my fabric stash! Shhh....don't tell!
 
If you want to try this all you need is:
 
Two thin oblong stones..(not sure what they call these.)
One stick
Fabric for your sails (or masts?) & flag
Scissors
Twine
Rope
Glue gun and glue sticks
Gorilla Super Glue
White spray paint for your stones
Fabric paint for the stripes on your sail
Small craft paint brush
Painters tape
Small letter stamps and ink pad
Black Gel Ink Pen
 
Follow what I did up above! Or do it whatever way you see your sailboat to be. It's amazing what can be created using natures gifts, and a bit of imagination and a vision! This would be a fun gift for kids to make for a dad's special day! It's definately unique! You can't buy this in the stores! I'm beginning to believe you can recycle just about anything! It's one cool sailboat!
 
I really love mine...or I mean Mr. Jack loves his....and it made the perfect paper weight and birthday gift too!
Hope you love yours too!
 
 
Always a pleasure to have you visit!
Would love your thoughts, but play nice!
 
 
With Sincere Appreciation I Would Like To Thank
 
 
for featuring my Two Sticks and a Stone Sailboat
Paper Weight! Thank You!

 
Sharing At:


Wednesday, July 30, 2014

Glass Fishing Ball Floats With Netting Knockoffs

Yea! Another knockoff project on my list done!
 
 
I have always loved these glass fishing floats and would love to find some real ones one day. But this for now is the next best thing! As luck would have it once again, I had everything needed to do this project...and I already had learned how to do the netting on the demijohns which is the same needed to put on the glass fishing balls!
 
On my last blog post of my Ballard Designs demijohn knockoffs  here, I had been searching the web for making the netting for the bottles I did and came across a blog with a tutorial on how to create a knockoff of these glass fishing floats here. How cool was that!


These two photo's became my inspiration...
don't you just love the colors!?
 
So beachy nautical!
 
So this is what I needed to create my glass fishing ball with netting knockoffs.......
 
twine
glass balls (clear glass Christmas balls)
I had four large ones....lucky me!
modge podge
food coloring
glue gun and glue sticks
scissors

 
First I poured a little modge podge in a small glass bowl, then added a drop at a time mixing with each drop until I got the color I was going for. Pretty how the color swirls as I was mixing. Once I got the color how I wanted it, I poured a little of the mixture in the balls and swirled it around until the whole inside of the ball was coated. I got out four coffee cups and set the balls upside down so the excess would drain out of the inside of the balls and left them for a few hours until they dried. I forgot to take a photo of the balls before I did this, but you all know what a clear glass ball looks like anyway....right?

 
Here is a couple of them after they were all dried and now ready to get to making the netting. Pretty color aren't they...I was excited how good they came out. I was on a roll! So far so good!

 
And here is the finished glass fishing ball float with the netting all done!
 
Not bad for my first try!
 
As soon as I can find some more large glass balls, I'm going to make some yellow, red, and greens ones to add to this group. Will be pretty!


Here they are with my demijohn knockoffs! I even had a couple of bags full of sand dollars my sister had given me a few years ago that popped into my memory while doing all these, so I got those out and painted a few. I then went hunting for a bowl of shells my kids and I had found at the beach when they were little and laid them all together for a real beachy look. Almost completes my beachy decor theme! One more thing I want to make....or maybe a few more things.


I really love my bottles and balls!
 
Next up......my boat! Sailing one that is!
 
Thanks for taking the time to visit and for letting me share my excitement and fun with you!
 
There is a reason for all this beachy theme going on and I'll share that with you on the next post!
 
Have a blessed day!
TaTa till later!
 
Linking Up Here:


Friday, April 26, 2013

Recycled Bottles for Moms New Lake House

 
Pretties for Mom
 
Well, the home I grew up in is no more. It was so old
it was literally falling down. The home was located
on Fine Lake outside of Battle Creek, Mi. I lived in
that home from the time I was three until I left home at
nineteen. It was a two story two bedroom tiny home, and
it had eight people living in it! Six girls and mom and dad.
And, ONE bathroom! Everyone always felt so sorry for my
father lol...all those women and just ONE Bathroom! I can
remember when dad would come home from work and after
dinner, he would take the newspaper, his readers digest, and
hit the bathroom and be in there forever lol! I also remember
having to go to the neighbors many times just to use the
bathroom! Everyone used to get a kick out of that, and it was
always a story people talked about laughingly. One other story
was how my mom would bath us in the lake in the evenings too!

A bar of soap, bottle of shampoo, towel...
scrub, dip,and out to bed we would go!
 
The neighbors always thought that was too funny!
Lots of memories of the place. The days when life was
simple, happy, and fun! Then.....we had to grew up!
 
 These are the only pictures I had and these are as they started the tear down.....
this picture is after a remodel years ago.....This front section was a screened in
porch  at one time when I was little.
 
 Can you imagine eight people living in this little house! Upstairs was two bedrooms, one tiny closet.
Down stairs was a small kitchen, living/dining room combo, one bath, and a screen in porch on the
lake front until the remodel years ago.....the screen porch became more living area, and then later
after my fathers death, a kitchen and eat in area. Our home along with two others were the first
homes built on this lake back in the very early 1900's. I was told by an elderly lady that lived
down the road, that at one time it was and Indian reservation....you could find indian spear
heads all over the place. I don't know how we all survived!
 
That cement slab you see there....it used to have a one car garage sitting there....
until a tornado took it down....I will never ever forget that day!
 
There used to be lots of big oak trees all around this house too....
but sadly....they are all gone now except one in the front yard by the lake! :(
 
 As the sun was setting on the lake in front of moms house. It's a huge beautiful lake, although
this photo doesn't show how big it really is! I used to love hearing the motor boats in the
morning when I would wake up in the summer, and whenever I smell gasoline....it takes me
back to the lake and boats....I think I miss that most of all!
 
 The only photo I have of the outside of my moms new home.....still a work in progress
but almost done! Then re-landscaping the outside, and a patio all across the lake front
of the house which now has sliding glass doors across the whole front.....will be beautiful!
 
Well the house was torn down to the ground this last year by
my sisters and brother-in-law, and lots of nieces and nephews.
 
They then rebuilt my mother a one story two bedroom home.
Now it's even smaller but it is just her. My father passed back
in 1987. I haven't seen it other than pictures, and when I did
it was pain and happiness. I'm happy for her but the house
just doesn't seem like home anymore. She got into the house
this last November and was able to celebrate the holidays
in her new home with all her family except for two of us girls
who live here Florida. What a nice gift....
a new home built by the hands of  her family.
That place definitely needs to stay in family!
 
Well my mom just turned seventy five so I decided to make
her something small by my hands. She has changed her
her colors and style in her furnishings of the house, so with
the pictures I saw, I was able to see the colors she has decorated
with. She chose pretty greens and blues which look great
seeing the house sits on a lake.....so I cued from that and made
her just a little something for decoration. I have something
else I'm doing for her as a special gift, but this was just
something for the house.
 
I've had all these dang bottles I have pack ratted, so I set
out to do something with those. I think they will look nice
on her tables, or even the kitchen bar that separates her
living and kitchen area. Hope she likes them!
 
They sure look pretty nice on my patio table by the pool!
I might just have to make me a set...I kinda like them myself!
 
I wrapped a juice bottle, and wine bottle, and can you guess
the little one?..........a beer bottle! And....no, the wine and
beer bottles weren't mine....I got them from a place my hubby
and I go to quite often for eats and great music on the weekends.

They save me bottles and corks for my crafts...nice people!
Like I need more of either lol!
 
I wrapped the bottles in twine, made rolled roses from old
book pages, added some twine knotted at the neck of the
bottles, painted moms colors in wide stripes around the
bottle and sealed them with modge podge.
 
I then brushed the edges of the paper flowers with the same
colors and they're done! I'm pretty happy with the out come!
They look pretty lakey/beachy to me! What do you think?
 
Will they pass as something nice for decorating!?
 
I hope so! It was fun creating them!


This is what I started with....a sparkling pink lemonade
beverage bottle, (loved the shape to it), a wine bottle...
mine was empty though lol, and the small bottle (not shown
here), was a beer bottle...a bud light beer bottle to be exact!
Oh....I didn't drink the wine either, or the beer!
...I don't drink hardly ever! But the sparkling beverage,
yes, and I love that stuff! It's so yummy!


Well, Happy New Home Mom!
Just a little something for you!
Now I just got to get them mailed to surprise her!
 
Well, I have to end this cause hubby is hungry!
 
Update: 8-27-14
 
A quick little tutorial on how to twine wrap bottles!
 
 
The supplies you'll need....I usually do three bottles at a time
for a set. Twine..Mod Podge..glass of water to clean your
sponge brush..three bottles different sizes, heights, and
shapes if you want..sponge brush or a paint brush will do
too..scissors..paper towel to squeeze water out of the
sponge brush if you have to clean it during this process..
wet paper towels for cleaning your fingers along the way.
This can get pretty messy, and takes about an hour and a half
or more, if you stay right with it until the end. And that timing
is for one bottle! Ready Set Go!!!

 
First I dab some Mod Podge on the end of my twine. It helps
with the rolling of it to get started. I always start at the bottom
of the bottle too.

 
Then I start rolling the twine to make a circle. (Excuse
my nails...I have made several of these lately and that
Mod Podge isn't nice on the nails. They need buffing
now and some polish!

 
While holding the little twine circle, I dab with the sponge
brush some Mod Podge on the front and back and then
smooth it out and into the twine just lightly so the circle
doesn't come undone with my finger tip.

 
Next, I find the center of the bottom of the bottle and
set the circle in place. Give it a couple of minutes to
take hold....Mod Podge dries pretty quickly.
 
 
Now take your sponge brush, dipped in the Mod
Podge and spread that on the rest of the bottom
of the bottle and......start wrapping the twine
around your circle. Don't worry about all those
sticky outy strands....they go away when your done
and it has dried completely. If by chance there are
any strands sticking out after your done that you don't
like, just take your scissors and trim it off. I don't normally
use this type of twine...it's a pain, but it was all they had at
the store this trip.....I normally love using Hemp Twine.
It's much smoother and easier to work with. Sticks
together better too. But I couldn't find any of that
anywhere! I went everywhere! Oh well....this will do.

 
Ok..keep wrapping also making sure you keep the twine snug
up against the row your wrapping around....if the circle
hasn't set enough, it might slip out of place. Just gently move
it back to the center. If there is excess Mod Podge on the twine,
take your finger moving it around the circle to massage it into
the twine. If the Mod Podge on the glass starts to dry, just add
more with your sponge brush. When adding more Mod Podge
on the glass bottle, push the brush up against the twine too, to
get it to adhere to the next wrap around of the twine.
 
This to me is the most tedious part....getting this bottom started.
After you get all around the bottom of the bottle and start up the
side of the bottle, the rest is a breeze!

 
Now you'll be coming to the part of the bottle where it curves
from the bottom up to the side ....Keep wrapping it around
but keep nudging it close to the already wrapped twine...you
don't want gaps that the glass will show through when your done.

 
Keep wrapping....keep it snug but don't let it overlap!
On the wrapped part you already have done...occassionally
take your finger nail and press the twine wrap to the bottle
to make sure it hasn't seperated from the bottle and do this
until it is pretty set and dryer. You don't want a bubble of
air between the twine and glass. I use my fingernail
because the Mod Podge wet twine doesn't stick as much
to my nail as it does to my skin on my finger tip....just
things I have learned as I have done these.
 
When I have finally reached the rounded edge of the bottle
I take my sponge brush dipping it into the Mod Podge and
brush it all around the bottle and just keep wrapping.

 
Yea....we are over the edge...now it will move quicker!
Oh...I almost forgot! The way I love to work my bottle
is to put it between my legs. I know sounds weird, but....
it works great because you can turn the bottle as your
wrapping which helps the wrap part go faster! I take the
twine strand with my right hand and wrap. My left hand
is on the bottom of the bottle turning it, plus I use my left
thumb to push the twine snug up against the twine already
wrapped as I am turning and wrapping. Hope that makes
sense. When I get half way down the bottle....I let the bottle
sit a few minutes until it isn't sticky anymore, then I flip the
bottle right side up and keep wrapping till I am done at the
top of the bottle. And instead of brushing the Mod Podge all
around the bottle once you get to the sides of it, you really
only need to brush a dab of Mod Podge on the front and back
of the bottle. Less Mod Podge, less mess, and it still sticks!

 
Remember if the Mod Podge dries on you before you get done
wrapping the area you smeared with it....just brush more on
over it....it will be fine.

 
Here we are finally up about a quarter of the bottle!
Keep wrapping around and around! You're getting there!

 
By this time the bottom has pretty much fully dried. See
how all those sticky outy strands have pretty much
dissappeard? Some is ok...thats the twine look.

 
I didn't finish this yet as I had to hurry to get this tutorial done!
Just Keep Wrapping all the way to the top! Once you have
reached the top....snip the end off with your scissors...add a dab
of the Mod Podge to the end just like how we started, and press it
close to the bottle and the last wrapped row. You will barely even
notice it's the end of the twine. And then your done....it will look
like the finished bottles below. Then you can leave as is or deck
them out with paint, bling, flowers, shells, lace, buttons, or
whatever you want!
 
(When I get this little bottle finished, I'll post the photo.
I just don't have time to finish it at the moment. I got a
deadline to meet on something else.)
 
 
And here she is finally all done! A little bling
and some flowers and she is pretty!
 
 
(these bottles were done using the hemp twine, very little
sticky outy strands...much better to work with too!)
 
If you have any questions....let me know here in a comment
or email me. Have fun and enjoy your creations!
 
 
TaTa Till Later!
 
Hugs, Love, and Blessings!
 
Thanks for stopping by....always love the company! :)
 
And....I totally appreciate your comments too!
 
 
With Sincere Appreciation I Would Like To
Thank The Following Websites Below!
My Moms Twine Wrapped Bottles Were Featured At...
Such a lovely surprise! Thank You!