
Yea! The Tutorial is finally Done!
What a busy, fun, and exciting week!
I was absolutely tickled pink but more like totally
surprised and honored when I found that my
surprised and honored when I found that my
Ballard Designs demijohn bottles with bling were featured
over at Knockoff Decor.com and at Hometalk.com
over at Knockoff Decor.com and at Hometalk.com
I was even approached by a friend to do a class
and share and teach how I made my bottles!
First time ever something I had made was such a
big hit. I'm truly grateful to so many for this. I've had
over 7,544 hits here on the blog in three days! They
have been shared all over Pinterest and Facebook!
I never dream so many would like these simple
little bottles! I am very grateful they were received
so well.....it's so nice to have nice things happen
once in while!
Thank you!!!
With such an overwhelming happy response to my
"Ballard Design Demijohn Knock Offs With Bling"
shown below, I was asked by so many to do a tutorial.
I am happy to share.....So here it is!
 |
| The bottles I made with bling! |
If you have any questions, contact me here in a comment
and I'll respond as soon as possible. I hope these are clear
enough for your success in making pretty bottles for yourself!
Enjoy!
Supplies you'll need:
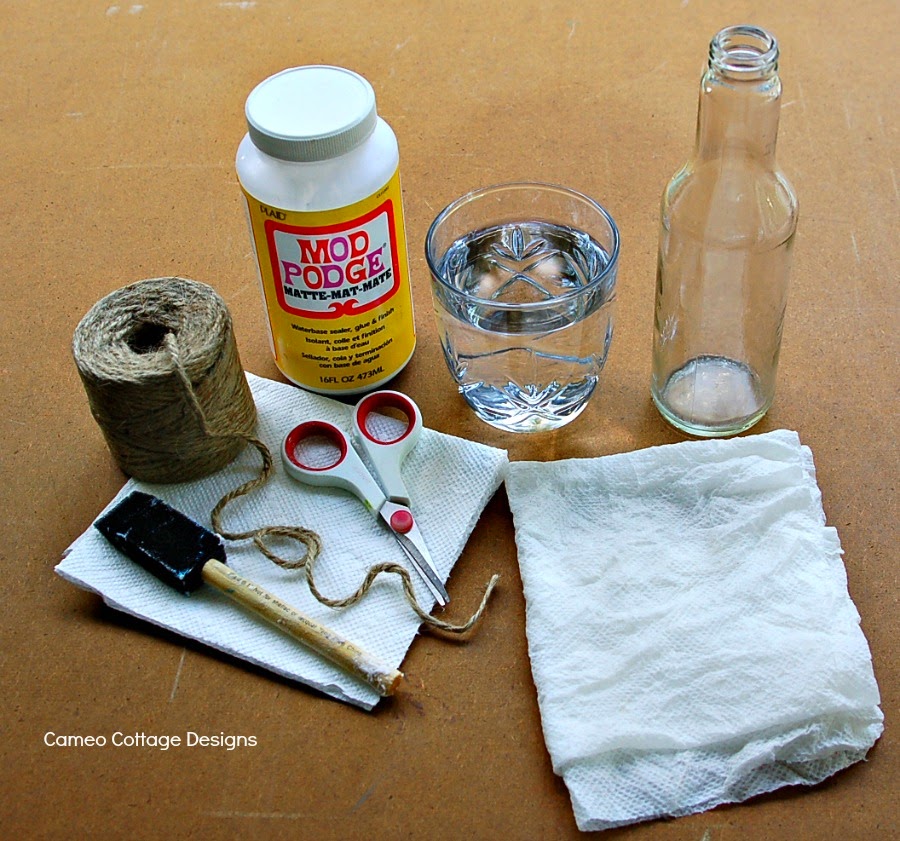
glass bottle....a wine bottle is great!
Mod Podge
jute/twine or small size rope
glue gun and glue sticks
scissors
craft paint sponge brush or paint brush
cup of water to rinse brush
dry and wet napkins

After I did my bottles I accidentally found this demijohn
and for a steal! Was so excited! This is what I'm using
for this tutorial....I can't wait to see it done!
Got your bottle ready!? Let's rock and roll ladies!
and guys! This is so much fun!
All the pictures are numbered with numbered instructions to match each step I'm explaining for you. I learn so much better by pictures than I do by written instructions.


Supplies you'll need:
glass bottle....a wine bottle is great!
Mod Podge
jute/twine or small size rope
glue gun and glue sticks
scissors
craft paint sponge brush or paint brush
cup of water to rinse brush
dry and wet napkins
After I did my bottles I accidentally found this demijohn
and for a steal! Was so excited! This is what I'm using
for this tutorial....I can't wait to see it done!
Got your bottle ready!? Let's rock and roll ladies!
and guys! This is so much fun!
All the pictures are numbered with numbered instructions to match each step I'm explaining for you. I learn so much better by pictures than I do by written instructions.
1. Starting at the top of your bottle, take the end of your roll of twine/jute and wrap it around the neck of your bottle where you want your netting to begin. You are going to be making a ring.
2. Cut the twine/jute the length you need around.
3. You can either tie a knot (cut a little extra to allow for the knot).... or, I wanted my ring cleaner looking so I dabbed a good amount of glue on both ends of my twine....overlap the ends about a quarter inch or a little less. When the glue is cooled down enough to touch but not set and dried yet, I squeezed the twine ends together and start rolling it back and forth in between my fingers to get the glue to smish into the twine fibers, and connecting the two ends together smoothly. Be careful not to burn your fingers! After a couple of times of burning my fingers, I learned to wait a bit instead of being in a hurry lol!
4. Place your ring on your bottle.
5. Now take the twine, and measuring from the top of your bottle to the bottom, take that length and x's that length by 4. (Example).. If your bottle is 5" tall, then your cut length would be 20" long. It's better to have extra than not enough. Now cut six pieces that length. I have even times it by five. Don't worry about all the excess you might have left. If you are going to do the twine wrap at the neck of your bottle, we'll use those pieces left over on that! I waste as little as possible! (A tighter weave means lots more knots! The more knots the more twine you need!)
(Note) The more strands of twine/jute you use, depends on how far spaced your netting, or weave lets call it, will look. If you want a wide/large loose look netting (how large your diamond shapes will be, you'll see this diamond shape look shortly) then you would use less strands... like six. If you want a tighter weave you would use more. In the picture of my bottles up above, on the large bottle which measured 13 1/2" high, I used 10 strands, on the medium size bottle which measured 11 3/4" high, and small bottle which measured 9 1/2" high, I used 9 strands for both. On the demijohn I'm using in this tutorial, I'm using 15 strands. (I want a tighter weave net look.) Remember, less strands = larger loose weave, more strands = tighter weave. Example in the photo below of each.
6. Take your first long strand and find the center of it and fold it in half...pinch it tight to form a bit of a crease. I do that so I don't lose my center allowing me to keep my strands even in length when attaching my strand to the ring.
7. Take the folded center of your strand and slide it up behind or underneath the jute/twine ring at the neck of your bottle. (picture 7. shows what I mean here.)

8. Now pull your folded center down over the ring making a loop, and pull your strands up through the loop.
9. This shows you have like a heart shape.
10. Pull the strands all the way through this loop to create your loop knot..make it snug up to the ring.
11. Continue doing that with all your strands and it should look like picture 11. when your done. Then I evenly distribute the strands on the ring if needed just by sliding them left or right. If you have used six strands to start with, you know have 12 strands to work with from your six knotted loops. Hope that makes sense....just look at the pictures! :)
12. I work to the right as I am making my netting....now take two strands, one from the knotted loop to the left....(which would be the right side strand,) and a strand from the right side knotted loop, (which would be the left side strand,) and then gage where you want your first row of knots to be on your bottle. Start there to tie your knot. It's important to keep your strands in line with how they fall. You don't want cross overs. Hope that made sense. Picture 12. shows what I mean I hope. This picture also shows where I am placing my first knot to start, and pictures 13.- 14.- and 15 shows how I make the knot.
This photo is how my hand is holding the jute between picture 14. & 15. It shows how I hold the twine to create the knot with my left hand. What it isn't showing, because I am snapping this picture with my camera is, my fingers of my right hand are holding onto the two pieces of twine laying over my thumbnail. I am going to pull the two twine strands that's underneath my thumb through this loop to the left until both strands have come all the way through. You then push the knot tight. You may have to adjust a little bit if tightening the knot made the knot go up higher from where you had decided you wanted your knot to lay to start your first row of knots. Just loosen the knot and ease it down a bit and tighten the knot back up again. Or if it is to low, you reverse that instruction. How you doing so far!? :) If your good, lets move on!
16. Now make your second knot. Once the knot is made, check to make sure its in line with your first knot. If not adjust it so they are even across as picture 19. shows. Now just continue around your bottle until your first row is done.
19. Now your first row of knots is complete.
20. Now start the second row repeating the same process you did to start your first row. Picture 20. shows some arrows. Now you see a diamond shape formed with your second knot. When deciding where you want your second row of knots place and to keep an even uniformed look all the way through making your netting, keep this in mind. The two top black arrows show the length of the twine strands from the ring to the first row of knots. The bottom two black arrows show the length of the twine strands from when you start your second row of knots (the white arrow.) Keep those lengths the same on each row all the way to the finish. A teeny bit off is ok, but you want each of your rows and the sizes of your diamonds to look uniformed throughout the entire knotting process. You get a good professional look that way! :)
Yea now we have reached the bottom of the bottle!!!! Ignore the neck of the bottle for now...We will do that last if you choose to want to do that. Now this to me is important....your LAST row of knots should hit right at the bottom edge of your bottle so as you set it upright flat on a surface, your knots aren't under the edge. Adjust the knots up more if it is. It's ok at this point if your diamond shape is a bit off.
Now lets get this baby finished!!!! There are two ways you can do this....I'll show you my way first...then the other ok?
Like I said before I like smooth finished surfaces. So as you see in the photo above, I have pulled each set of strands tightly, starting with one set on one side (left) of the bottom of my bottle, and take my glue gun and glue it in towards the center (not all the way to the center) of the bottles bottom. You don't want a big hump under your bottles bottom! Then I take another set of strands on the opposite side (right) of the bottle and do the same thing. Think of a clock....12, 3, 6, and 9. Those are the strands I glue first. Then I glue down the rest in between each. (I do that to help get an even pull down of my netting because if you pull down on one side, it tends to make the ring at the top of your bottle shift. You want that ring to lay even all the way around the top of your bottle when your finished with the bottom.) Then I trim all the excess strands of jute off from where I glued them down. When the glue isn't so hot and cooled some, I press the jute ends down into the glue and smooth them out on the bottle. When it is all done it will look like this.....below:
See how the jute butts up against the bottom knots. Now the bottle will sit nicely flat on your surface. No rocking!
Ok... moving on to get this finished look! Now glue doesn't always adhere to glass well. So the next step I do is taking my jute and do a wrap all around the bottom of the bottle starting in the center and work around until I've reach the last row of knots at the bottom of my bottle. (Seen up above.) I use my Mod Podge and twine/jute to do this with. I start by taking my roll of twine end, and dip the end of it in the Mod Podge. Don't cut off the twine yet....you will need a lot! Then I start wrapping around and around making a small circle in my hand, and then I brush Mod Podge all over the top and bottom of it. I find the center of my bottles bottom, and place my little circle there. I wait a few minutes to let it dry and hold in place. The photo's below show how I started my little jute circle to jute wrap the bottom of my bottle. Warning this gets messy! Oh and if you would like to know how to Twine Wrap Bottles in twine from bottom to top see this tutorial here:, it's at the bottom part of the post. These photos come from my tutorial of that there.
Once firmly in place I take my sponge brush and smear Mod Podge all over the twine strands, dried glue, and the bottles glass bottom. Then I continue wrapping around and around the little circle keeping each wrap snug up to the wrap before. The Mod Podge dries pretty quickly so I have to be brushing more Mod Podge as I go until I have reached my knots at the bottom side of my bottle. Then I snip the end off, brush it with Mod Podge and press it up close to the last row around I did. I then go and press down all that jute wrapped bottom making sure my wrapping has attached itself to the bottom well and nothing while I was wrapping got an air bubble somewhere. And I am DONE!!! With the bottom anyway.
******************************************************
Now the other way to finish the bottom off is by making another ring like you did on the neck of the bottle. Make it about half the size of the circumference of the bottom of the bottle.
Next, tightly pull and tie all of your strands to the ring and tie the same knot you did through out your bottle netting.
Once all your knots are done, trim all the extra pieces of jute and I recommend adding a dab of glue to the knots to keep them from coming undone. And your done! With the bottom anyway....this way is a lot faster and less messy, but sometime those knots stand in the way of the bottle sitting flat on a surface. It can also raise the bottle from the surface it's sitting on too. And again, I like mine to look finished on the bottom. It just comes down to your preference.
I don't have a photo of that because I didn't like it and did it the other way. Sorry. Just imagine a ring with your strands tied in a knot to it. :)
Almost DONE!!!! Hurray!!! Now lets get this neck finished!!
This part is pretty easy!
Take the end of your twine again, and dip it in the Mod Podge. Lay it on your bottle (I start at what will be my back of the bottle,) and lay it right above the ring close. Let it set to adhere to the glass. Next, take your sponge brush and dip it in your Mod Podge and brush it around the neck of the bottle, just one once around. Now start wrapping your twine around and around, brushing more Mod Podge as you go. Make sure to keep all the twine wrap close together as you wrap so there are no gaps. When you get to the top, snip off the twine...Mod Podge the end and lay it up against your last row. And you are finally finished and have a beautiful bottle to add to your home decor! If you want take a look at the link I put up above for the Twine Wrapped Bottles to see more detail in pictures.
(NOTE)....I mentioned up above at the beginning of measuring your strands of twine for the knotted netting for your bottle, that you might have a lot of excess twine left when you cut your strands off at the bottom. And I mentioned I waste little. I had for this bottle several long lengths of twine after cutting it off at the bottom. I used these strands to do the twine neck wrap. You can't even tell the neck wrapped area was done in pieces! See no waste here! :)
(NOTE)....I mentioned up above at the beginning of measuring your strands of twine for the knotted netting for your bottle, that you might have a lot of excess twine left when you cut your strands off at the bottom. And I mentioned I waste little. I had for this bottle several long lengths of twine after cutting it off at the bottom. I used these strands to do the twine neck wrap. You can't even tell the neck wrapped area was done in pieces! See no waste here! :)
Done!!!!! Now Enjoy your new creation! Make more too!
Now if you want, add some bling on the front!
Now if you want, add some bling on the front!
Just an idea to share that I did.
When I finished this big demijohn I thought I wondered
how it would look with a topper. Not that it needed one
but I just wondered. A couple of years ago, I recycled my
light bulbs by wrapping them in twine just like you do twine
wrapped bottles, and I stuck a stick on the screw in part of the
bulb and made pears! Well I spied them in a bowl on the table
and thought hmmmm....might work for my bottle topper. This
bulb was a three-way light bulb so it was larger. I stuck it in
upside down and darn if it didn't work and the right size too!
You could do this on smaller size bottles too, just use smaller
light bulbs! Or corks absolutely work the best too!
And of course I pinned on some bling! I love sparkly!
It's a pretty piece....although the picture doesn't do it
justice.
And this is my recycled light bulb pear!
I hope this helps you to make your own demijohn
knotted twine net bottles. Between the photo's and
instructions, you should be able to be successful!
It's so hard to do this especially the written instructions
so I hope I passed in helping you.
TaTa for now!!!
I am over this lol! Three days spent doing the bottle,
taking pictures, editing pictures, and writing instructions,
and posting the tutorial! Love you all but I am outta here!
Oh and this technique can be used on so many things!
Lamp bases, lamp shades, flower pots, vases, cans, bottles,
candle holders, glass balls, and the list goes on!
Have fun and Enjoy!
Sharing Here:


