Showing posts with label pearls. Show all posts

Monday, March 18, 2013

Rustic and Frilly Twine Easter Eggs

 
Working on Easter Pretties
 
I had a totally different idea with what I was
going to do with these plastic eggs I got,
but as i was looking through all my laces,
I came across several bags of these sweet
little bonnets I had purchased years ago!
 
 
And of course forgotten all about them!
 
I thought, bonnets...Easter....Eggs....
perfect combo!!! A perfect use for the bonnets!
 
I had already wrapped the colorful plastic eggs in
twine, but I thought to myself, hey......
nothing wrong with rustic, frilly, and dainty!
There were only four colors with the bonnets,
so I made just a set of four.
 
A little bit of lace, pretty ribbon, the bonnets...
and just cuteness as the result!


Now I'll take some of the other eggs and do what
I had originally planned with them. They will
look really sweet on the table with these too.
 
Cute huh? Well I think so!
 
Thanks for the visit!
 
TaTa Till Later!
Love, Hugs, and Blessings!
 
Debi
 
 
Linking up to:

Wow Us Wednesdays at: Savvy Southern Style 
Frugal Friday at: The Shabby Nest
The Scoop at: A Stroll Thru Life


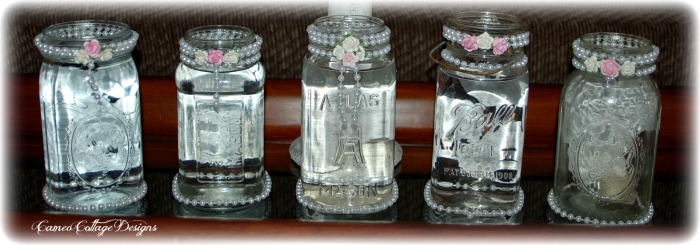
Fun With Mason Jars and Napkins and Imagination

Old Mason Jars with Pretty Purpose
 
 
 I finally finished all the jars I wanted to do with the
pretty spring floral napkins I had laying around here.
I'm using them for flower vases or candle holders.
They look really pretty on my table and buffet
in the dining room with the water in the jars,
even more so if the jars are setting where the
sunlight is shining behind them.
I might even use them to store some of my bling
and buttons, and ribbons in too.


I used two different pretty floral napkins to create
these five little lovelies. I think the strands of
pearls and the rhinestone brooches just top them off.
 
Because the napkins were double layered,
I peeled the back layer off then glued them on
white paper, to get the colors to show better.
I recut them again, then glued them on the jars.
In the photo above the jar on the right I didn't do that.
 
As you can see, when the light hits it a certain way
the pores in the paper show up darker, almost
giving it a moldy look. I didn't like that,
so the white paper behind takes that away.
 
You end up having to cut the flower out twice,
but it sure is worth it. It looks much better.
 
I used Modge Podge to glue them on, and for
the pearls and rhinestones I used the E6000 glue.
Was a bit of a pain doing those pearls, and lots
of patience! I found to keep those pearls from
 rolling so much, it was better to spread the glue
on the jar....give it about a minute or less or more
depending on how thick it was, to let it start drying
and then lay the pearls on, press it lightly, and then
adjust the line if any of them started to roll again.
Once it got close to the drying part, they stayed in
place without you helping them. Don't turn your
back on them until it gets to that point, or your
straight line will get messed up, and you will have
to pry it off and redo it again. I had to do that on
a couple and I hate having to do things twice! 
 
 
The front of all of the jars.
 
 
I wanted the back of the jars to be pretty too,
so I added Mulberry paper roses, and cut the pearls
longer so they would dangle a bit down the back.
 
Now all they need is some pretty flowers or candles!
They sure sparkle and if anyone knows me....
I love sparkle! I really love these!
 
Now you make some!
 
Sharing Today at:


TaTa for Now!
Love, Hugs, and Blessings!
 
Debi
 

Sunday, February 24, 2013

Fun with Mason Jars - Pearls - Napkins - Lace - Bling

 
I'm playing again.............
Well I had to do something with all these jars I've collected!
 
Plus all my azalea's are in bloom and I just had to pick some
and bring some pretty inside.....when the flowers die out
we use them for candle holders....double goodness!
 
These are just the first few....the one with lace and the big pink
flower I did a long time ago when a friend saw this on FB and
wanted some.....but of course I had to make one for me too.
 
 
This one I cut out this gorgeous rose from some paper napkins.
I added strands of pearls and some sparkly bling.
 
 
This is the back of the same jar above,
but I'm making another with the front to look like this.
 
 
This one I did about a year ago
but needed something for my pretty azalea's I picked.
It was a candle holder before.
I love this one!
 
Well I got about 15 more to go, lots of pretty napkin
flower cuts outs and more ideas...so back to work!
Oh I really mean playing!
 
Love, Hugs, and Blessings!
 
TaTa Till Later!
Debi


Sunday, February 3, 2013

Pretty Embroidered Lace Crown For Princess


Having Fun With Lace, Pearls, and Sparkly!

 
Making a crown with embroidered laces has been on my to-do list for oh.....about 2 years now! (Along with about a million or more other projects and ideas for cripes sake, so how IS a girl to remember!) Well, I was on Pinterest the other day and saw a tutorial for making these, so I said to myself, "self.....I think now is the time!" I had everything I needed right upstairs so let's have at it!! I'll make one for my granddaughter Ms. Emma! The way I have felt lately I needed something to get me out of my funk and inspire me! This did it! Miss Prini who is like my shadow followed me upstairs so I could gather the goodies to create with. As I was throwing lace out of my lace bin, some landed on Prini's head and that made me think Prini needed a pretty crown too! She thinks she's a Princess, and her real name is Princess, so yep....she needs the crown to add to her wardrobe! Next will be her tutu to match hehe! 

 
This started out as white lace but I painted it a sweet soft pastel pink, added rhinestones, pearls, an organdy flower with a pearled center and last, a sprinkle of glitter! The glitter isn't showing its sparkle in the pics though darn it. Ms. Prini here isn't to sparkly either lol! She really ISN'T the Fru Fru type of girl and hates even more when I mess with her head to girly her up!
She'll reluctantly play along for a little bit, but with attitude....can ya tell?!


Prini ran and hid so we got Katie Jo the bunny to finish the job. :)
She loved it...it matches her ears! hehe
 
 
She's back! Doesn't she look like a fairy princess!? Say goodnight Prini!
 
Pretty sweet we thought....and it was fun to make....messy but fun!
 
I have several more I made too....
working on the pictures so will post those pretties when I'm finished.
 
Ya know......I'm thinking maybe a give away is in order!
 
Hmmm....I'll think on it and let you know in the next post!
 
Well thank you for stopping by! It's always so nice to have you here!
 
TaTa Till Later!
 
Love, Hugs, and Blessings to ya!
Debi